(Updated: May 10, 2021)
Building a forge stands alone as a diy blacksmithing project since so much of our success relies on our ability to get a proper heat. It's also unique in that you can put it together in a single morning depending on your preferences.
I'm starting with coal forges because they're simpler to make. You're not concerning yourself with air-tightness and heat containment.
You can have a simple coal forge up and ready in 20 minutes if you're in a hurry. You can also take hours welding together a hood, creating a custom basin, and fine-tuning.
Here's what you'll need at a minimum for a 20 minute coal forge (assuming you have the fittings already):
- Old Barbecue Grill (Weber, etc.)
- Hair dryer
- 2"plumbing tee
- Threaded plumbing nipples (2)
- 2" plug
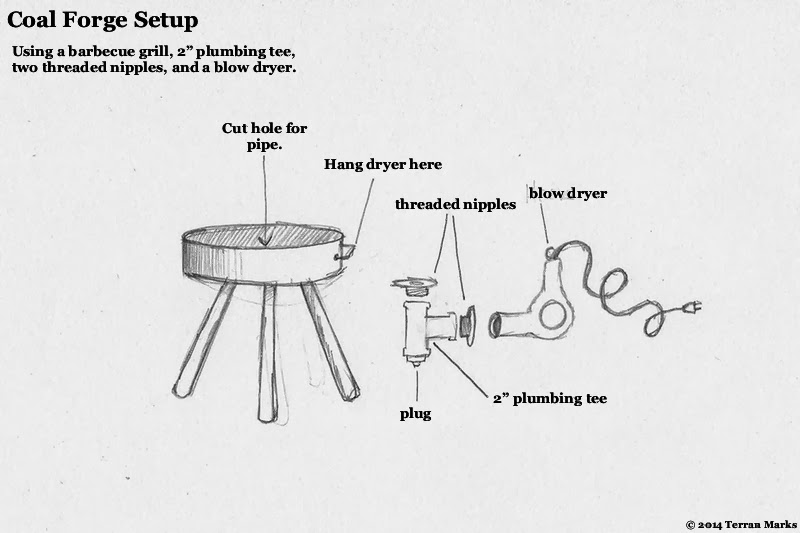
The grill should have at least one handle to hang the hair dryer from. Don't worry about the heating element being burnt out if you're using an old one. It just has to force air into the piping.
Cut a larger hole in the bottom of the grill. It should be large enough to allow the 2" plumbing tee through, but not so large that the threaded nipple holding it in place falls through.
Take a look at this diagram to get a better idea of what I mean.
It's not the most elegant setup, but you don't have to be elegant to be effective. This is something you can put together on a Saturday morning to be ready to forge that afternoon. No more excuses about not having proper equipment, but I don't have to tell you that.
If you'd like to get some other perspectives, take a look at Anvilfire.com's Machinery and Tool Plans.
They provide the plans for a brake drum forge as well as specific forge plans for armor and sheet metal.
For a compelling visual example, I usually turn to Will from StormtheCastle.com and his Youtube channel epicfantasy.
You may remember his videos from my post on knife making a few weeks back.
In this video, he lays out how to make an easy blacksmith forge:
Can't see it on your phone? Watch it on YouTube.*
It could be that you live in a place that doesn't have a cheap source of coal, you plan to do A LOT of smithing and buying bags of charcoal would get expensive, or you prefer the even heats and less time-intensive fire tending that gas forges provide.
Gas Forge Plans
This type of forge building will take more time and skill to complete for the typical weekend warrior. Since gas forges run off of compressed gas, we want to maximize our usage of that gas as it comes out of its compressed state.
In other words, we want to create a box or vessel to mostly contain that gas as its released. It shouldn't be completely airtight and we'd be hard-pressed to do that anyway.
Lighting a fire in an enclosed space with a consistent supply of fuel (gas) can lead to some intense situations. We want to direct that intensity in a safe way.
Creating a functional gas forge will require some welding knowledge. It will also take a larger amount of supplies than the gas forge above.
Here's a list to start with:
- Welder
- Welding mask
- Grinder
- Fire brick or blanket
- Sheet metal
- Clamps
- Tubing
If you don't already have the larger items in this list, you might consider enlisting a friend's help and equipment. It will most likely take you a bit longer than a Saturday morning to complete, too.
Take a look at the following video for an outside-the-box idea for creating a gas forge.
Can't see it? Watch it here.
Now, I'd never thought of that before watching the video. A few warning bells went off in my head in terms of safety (making sure the cylinder is COMPLETELY clean before you start creating sparks with a grinder for one), but in terms of creative solutions to the problem, it's pretty awesome.
No welding pieces of sheet metal together and worrying about the corners. The barrel shape and narrow openings contain the heat and distribute it extremely well.
Some Things to Consider
Obviously, your ability to get your hands on materials and fuel at a fair price will help decide which forge type you choose. There are parts of the U.S. that benefit from being very close to coal seams (the eastern states usually come to mind). I'm sure this holds true for other parts of the world.
When I was forging in North Carolina, I could see the attraction of using coal. It was readily available. However, when I was heading back to the Pacific Northwest, the portability of my NC Tool gas forge and the availability of propane canisters made sense, too.
Gas forges don't have the same feeling of tradition that comes with coal forges. You don't have the glowing coals and you're not actively tending your fire.
The trade-off is a more uniform heat and cleaner air. Not to be a downer, but breathing in coal dust and smoke for even a day can have irritating side effects.
The last thing I'd think about is what I can do today to get closer to forging. Since I'm not a trained welder, I'd be more likely to build a coal forge out of a brake drum like Will showed in his video or out of an old grill as I laid out.
I'll leave off with that. What can you do today to get closer to forging?
---
Want to Learn Blacksmithing?
- Everything you need to know to start blacksmithing.
- Save $$$ on Anvils and Forges.
- Learn the ancient craft on your own time. (No travel.)


No comments:
Post a Comment